The kOS Telnet Server
kOS now supports the ability to enable a telnet server inside Kerbal Space Program.
Warning
To use this feature you must make sure you have the main game option “Simulate in Background” turned on. It can be found in Kerbal Space Program’s main menu settings screen, under “General” settings.
More explanation can be found further down this page in the section titled “Simulate in Background”.
Telnet is an old network protocol designed in the early days of the Internet, long before World Wide Web. Its purpose was (is) to allow you to get access to the remote command line interfaces of distant server computers, acting as if the keyboard and computer screen in front of you was a terminal hooked up to a distant computer. kOS uses this protocol to let you access the kOS terminal from a program outside of Kerbal Space Program.
There are freely available programs you can use as the telnet client to behave like terminal windows outside of the KSP window. A list of them appears below in the section called Telnet clients.
There are some security implications of enabling the kOS telnet server, and the first time you turn it on you will see some warning messages to this effect. If you want to read further about these concerns before deciding to turn it on, see the section called “Security” at the bottom of this page.
Telnet clients
The telnet server for kOS requires the use of a telnet client program. We recommend the following programs, although you can use others:
- For Windows
We recommend Putty, the free terminal emulator for Windows, although any good terminal emulator should do the job, provided it is capable of operating in an “XTERM - compatible” mode.
- For Mac
You shouldn’t have to install anything. There should be a telnet client already installed, which you can access by opening up your command terminal, and then running it as a command-line tool. To see how to use it, read below in the section titled “HOWTO: Command-line client”. The built-in Terminal.app for OSX understands the XTERM command sequences that kOS uses and in fact identifies itself as a type of XTERM when used with a telnet client.
- For Linux
You shouldn’t have to install anything. There should be a telnet client already installed, and an xterm program already installed in most any Linux distribution. Open an xterm window, and in that window type the telnet command, as described by the section titled “HOWTO: Command-line client”
Simulate in Background
To use the kOS telnet feature, you must have the stock KSP game’s option called “Simulate in Background” turned on. This option is found on Kerbal Space Program’s “General” settings screen (Note, this is the settings screen you find on the title screen of the game, NOT the smaller subset of settings you find on the “escape” menu in-game.)
Why? Because when that option is turned off, the entire KSP game is paused any time you switch focus to a different program on your computer other than KSP. When the game is thusly paused, the kOS telnet server inside the game is frozen and can’t respond to anything the telnet client sends it. (If you are typing into a telnet client program on your computer, then that will be the the focussed window instead of the KSP game, so this issue will come up the majority of the time.)
Using it
Turn on the telnet server by going into the app control panel and clicking on the green circle next to the word “Telnet”. Alternatively, you can issue the command:
SET CONFIG:TELNET TO TRUE.
from any terminal window in kOS.
The very first time you do this, you will get a warning message, as per SQUAD’s rule number 5 about mods that run network services. After accepting and clicking “yes”, the server will be running on loopback 127.0.0.1 (if you want to make it run on a non-loopback address, you will get a secondary warning message about that too.)
Launch your telnet client (there is a list of telnet clients that are known to work listed below.
When you first log in to the server you should see the “Welcome menu”, which is a screen looking like this:
Terminal: type = XTERM, size = 80x24
________________________________________________________________________________
              Menu GUI   Other
              Pick Open Telnets  Vessel Name (CPU tagname)
              ---- ---- -------  --------------------------------
               [1]   no    0     Randy Viewer (CX-4181())
               [2]   no    0     Randy Viewer (CX-4181())
               [3]   no    0     Randy Viewer (CX-4181())
               [4]   no    0     Randy Viewer (CX-4181())
               [5]   no    0     Randy Viewer (CX-4181())
               [6]   no    0     Randy Viewer (CX-4181())
--------------------------------------------------------------------------------
Choose a CPU to attach to by typing a selection number and pressing
return/enter. Or enter [Q] to quit terminal server.

(After attaching, you can (D)etach and return to this menu by pressing Control-D
as the first character on a new command line.)
--------------------------------------------------------------------------------
>_
Or, if there are no CPU’s within range, it will look like this:
Terminal: type = XTERM, size = 80x24
________________________________________________________________________________
              Menu GUI   Other
              Pick Open Telnets  Vessel Name (CPU tagname)
              ---- ---- -------  --------------------------------
                                      <NONE>
At any moment you can force a redraw of the menu by entering any gibberish non- numeric data and hitting enter.
This menu should match 1:1 with the list of CPU’s you see on the kOS applauncher control panel.
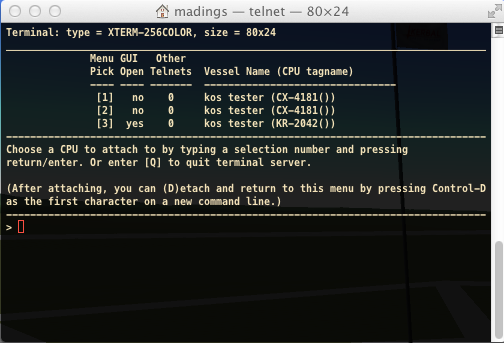
The welcome menu, shown here in a Mac OSX terminal.
Pick a CPU. Pick one of the CPU’s listed by typing its number and hitting enter.
Your telnet is now connected to the server and should behave as the terminal for that CPU. You can type commands and do what you like, the same as if you had been directly on its window.
See the section labeled Special Keys to see how to use the keyboard from your telnet client.
It is possible to have multiple terminals hooked up to the same in-game CPU. They will all behave as clones of each other, each being an equal “first citizen”. (For example a pair of people could execute the “stage.” command by having one of them type “st”, then the other types “age”, followed by the first person typing “.” and the return key.) All the keyboards and all the screens are slaved together to be equal. You can view the in-game gui terminal while somebody is typing on a telnet temrinal.
In order to make the terminals act as clones of each other, the game will attempt to keep them all the same size. If you resize your telnet client window, it should cause the in-game window to change size to match. (If your terminal type is XTERM, then the same thing works in reverse. If it’s VT100 then it doesn’t.)
Warning
Certain implementations of the xterm terminal emulation and the telnet client have created a strange unending cascade of terminal resizes when you have two different telnet clients connected to the same GUI terminal and one of them is dragged to a new size. Because some implementations don’t wait until they’re done resizing to report their new size through telnet and instead report their intermediate sizes as they are being stretched, the attempt to keep them the same size causes them to effectively “argue” back and forth with each other, constantly changing each other’s size. If you experience this problem (your terminal window will be flipping back and forth between two different sizes, resizing itself over and over again in a neverending loop), you can try to get out of it by issuing a hardcoded command to set the terminal size, such as:
SET TERMINAL:WIDTH TO 50.
Doing this should force all the connected telnet XTERM windows to stop arguing with each other about what the size is, and get them synced up again.
At any time you may disconnect your telnet client from the terminal by hitting control-D as the first character of a new line. This will bring you back to the telnet welcome menu again.
Special Keys
The following keys have special meaning in the telnet session:
- Control-L
Force refresh Pressing Control-L forces the kOS telnet server to redraw your whole screen for you from scratch. This is useful if you encounter strange line noise, interrupted messages, or for just any occasion where you suspect the screen isn’t being drawn correctly. Pressing control-L will ensure your display gets fully re-synced with what’s in the buffer in memory for the terminal.
- Control-C
interrupt process This is the same meaning as control-C in the normal GUI terminal - it breaks the program execution. The reason it gets a special mention here is that it also causes a flush of all the pending input you may have typed ahead in the queue. If you’ve been typing blindly ahead, and then hit Control-C, it will erase your typed-ahead keys as it sends the interrupt to the server. This is deliberate, and typical practice for an interrupt character sent over a remote shell setting.
- Control-D
detach If you hit control-D as the first character of a new line, it will detach your telnet session from the CPU and return you to the welcome menu.
- Cursor Keys
should be mapped If your terminal has identified itself as one of the known types that kOS supports, it should understand your arrow keys as arrow keys. If you see the text “[A” when you type up-arrow, or “[C” when you type right-arrow, this is a clue that kOS didn’t recognize your terminal type properly.
- Other Keys
might be mapped Some keys like the Del (to the right), Home, and End keys are often not mapped correctly in some terminal emulator programs. If you have trouble using HOME and END, you can try Control-A and Control-E as alternates for Home and End.
- Control-A
home This is an alternate way to press the “home” key, just in case your terminal emulation isn’t sending the officially understood terminal code for it.
- Control-E
end This is an alternate way to press the “end” key, just in case your terminal emulation isn’t sending the officially understood terminal code for it.
- Control-H
backspace This is an alternate way to press the “backspace” key, just in case your terminal emulation isn’t sending the officially understood terminal code for it.
- Control-M
Return This is an alternate way to press the “enter” or “return” key, just in case your terminal emulation isn’t sending the officially understood terminal code for it.
HOWTO: Putty client
(These instructions assume you use the default kOS Telnet server settings, of the loopback address 127.0.0.1, and port number 5410. If you’ve changed those settings then alter the numbers you see here accordingly.)
Run KSP, and get it into a scene where there exists a vessel with at least one kOS CPU loaded into it.
Run Putty.
On the first dialog you see, click the Telnet radio-button selection.
Type in the number 127.0.0.1 in the large blank above the radio buttons that is labeled “Host Name (or IP address)”.
Type in the number 5410 in the smaller blank to the right of it that is labeled “Port”.
At the bottom of the screen, select the radio button labeled “Never” under “Close window on exit”.
Click the Open button to connect to the server.
(You can also save these settings under a name for later re-use.)
Step 6 is important. Without it, Putty would just make the window disappear any time there’s a problem, making it very hard to diagnose because you can’t see what message the server was sending back to you just before the window went away.
HOWTO: Command-line client
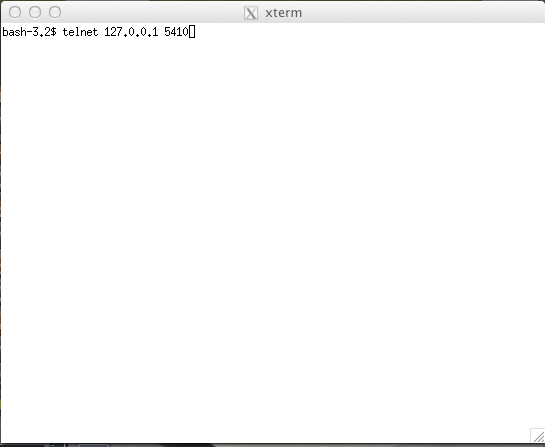
Showing the use of telnet in an x-term window.
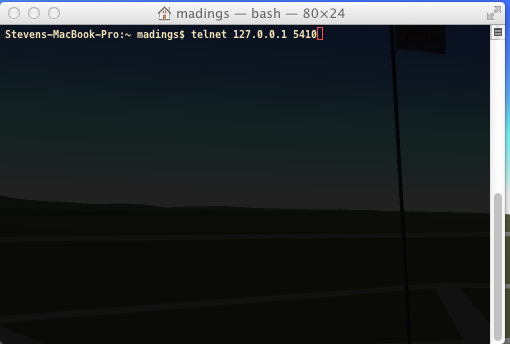
Showing the use of telnet in a Mac OSX terminal.
(These instructions assume you use the default kOS Telnet server settings, of the loopback address 127.0.0.1, and port number 5410. If you’ve changed those settings then alter the numbers you see here accordingly.)
Run KSP, and get it into a scene where there exists a vessel with at least one kOS CPU loaded into it.
Open a command shell window that either IS xterm, or emulates xterm. For OSX, the default command shell should work fine. For Linux, you should actually have the xterm program itself installed that you can use.
At the shell prompt in that window, enter the command:
telnet 127.0.0.1 5410
HOWTO: Other client
Set the IP address to 127.0.0.1 using whatever means the program has for it.
Set the port number to 5410 using whatever means the program has for it.
Set the terminal to XTERM emulation mode if it has it, or VT100 mode as a less good, but still perhaps workable option.
Run the terminal.
Security
The telnet protocol performs no encryption of its data, and as such any attempt at securing the system using a name/password combination would have been utterly pointless. Rather than provide a false sense of security that’s not really there, we decided to make it obvious that there’s no security by not even implementing a name and password for connecting to the kOS telnet server.
The purpose is to make it clear that if you want to open up your kOS telnet server, you need to be careful about how you do it.
The default settings that kOS ships with sets your kOS telnet server to operate on the loopback address (127.0.0.1) so that you won’t accidentally open anything up to the public without thinking about it and making a conscious decision to do so. If you don’t know what that means, it means this: Any server that runs on the magic special address 127.0.0.1, known as “loopback”, is incapable of taking connections from other computers besides itself.
In order to allow your kOS telnet server to take connections from other computers, you will typically need to do one of two things:
Either set the CONFIG:IPADDRESS option to the address of your computer and then restart your telnet server (turn it off and on again using the button on the control panel), or (much better), set up a remote ssh tunnel that will map from your current machine’s loopback address on the port number of your server to some remote other computer you want to connect from, to a port on it. The ssh tunnel is the preferred method, but describing how to set one up is beyond the scope of this document. You can read more For windows or For UNIX (both Mac and Linux).
Example: Let’s say you have a remote Unix machine you’d like to enable logins from, from there and nowhere else. You can forward from your own machine’s 127.0.0.1, port 5410, to the remote machine’s, oh let’s say 127.0.0.1, port 54100. Then anyone on the remote machine could telnet to ITS 127.0.0.1, port 54100 and end up talking to your machine’s port 5410 on its loopback address.
Port forwarding
If you opt to use a non-loopback address on your kOS telnet server, then you will probably also, if you have a typical home network setup, need to enable port forwarding on your router if you want people from outside your house to connect to it. (Again, think about the implications of doing so before you do it). This is a topic beyond the scope of this document, but help can be found out on the web for it. Search for “port forward home router”. (It is probably also a good idea to include the make & model number of your router device in your search terms, to get a nicely narrowed result that’s exactly what you need.)
Why not ssh?
The original plan for kOS was to include an ssh server instead of a telnet server. However this proved problematic as open source solutions in C# for the server-side of ssh were hard to come by (there’s several for the client side only, and plenty of server-side code that’s not in C#), and implementing the entire server side of the ssh protocol from scratch is a daunting task that would have taken too much time away from other development of kOS. (While implementing from scratch the server side of the older, simpler telnet protocol, while still work, was more doable).
Homemade telnet clients
This section is only of interest to hobbyists making Kerbal console hardware rigs and software developers trying to make interface mods that pretend to be kOS terminals. If you are neither of those two, then don’t worry if this section looks like gibberish to you. It can be skipped.
TELNET PROTOCOL
If you wish to make your own homemade telnet client and connect it up to the kOS telnet server, the following is the required subset of the telnet protocol that your telnet client must speak, and the terminal requirements it must fulfill:
It must suppress local character echoing, and enter character-at-a-time mode, by implementing both the ECHO negotiation described by RFC857, and the SUPPRESS GO AHEAD negotiation described by RFC858. These are used in the following way: Your client must NOT ECHo (letting the server do it), and your client must suppress go-ahead messages (allowing real-time back-and-forth).
It must implement the underlying DO/DONT and WILL/WONT, and SB/SE infrastructure of the main telnet RFC854. It must send break (ctrl-C) as the IP interrupt process command (byte 255 followed by 244). kOS does not use much of the negotiations of the protocol mentioned on RFC854, other than those that are necessary to enable the other ones mentioned here.
It must implement the Terminal-Type option described by RFC1091. Furthermore, as of this writing, kOS only knows how to understand two terminal types, “XTERM”, and “VT100”. If your terminal type is identified as anything else, kOS may deny your connection, or at the very least just not work right. Even terminals that are capable of emulating XTERM or VT100 commands won’t work right if they don’t identify themselves as XTERM or VT100. kOS does not know how to guess what emulation mode to enter if it doesn’t recognize your terminal type string.
It must implement the NAWS, Negotiate About Terminal Size option, as described by RFC1073. kOS uses this to decide how to size its mental image of your terminal to match your terminal’s real size. Note that this negotiation is one-way. Your client can use it to tell the server about its size, but the server can’t use it to tell your client to change its size. Instead if your client can respond to changing sizes at the behest of the server, it must do so through terminal escape code characters sent back to it on the stream, above the telnet protocol layer itself. (For example, if you identify as XTERM, you will be sent the XTERM escape code pattern ESC [ 8 ; height ; width t, which is the XTERM escape code for setting the terminal size.) This is because the telnet protocol was never written to accommodate the concept of server-initiated resizes.
Making a telnet client from scratch that actually follows protocol may be a complex enough task that the smarter solution is to just use an existing telnet program, if you are trying to create some sort of hardware rig. These days a small cheap mini-hardware implementation of Linux should be doable, and could include the telnet client installed in it for very little storage cost.
TERMINAL EMULATION
As of right now, the terminal emulation of kOS only really supports XTERM or VT100 well, however the infrastructure is in place to support modifications to map to other terminal types. If you want to try a hand at adding the terminal emulation for a currently unsupported terminal, you’d do it by subclassing the kOS.UserIO.TerminalUnicodeMapper class. You can look at kOS.UserIO.TerminalXtermMapper as a sample to see what you need to do.
If you have a project where you want to just work with the terminal codes already supported, then these are the subset you need to support:
- ASCII
The following terms should have their normal ASCII meaning:
- 0x08 (control-H)
backspace key
- 0x0d (control-M)
Return key. On output it means go to left edge but don’t go down a line. A typical eoln needs to occur using its ASCII standard of both a return character 0x0d AND a linefeed character 0x0a
- 0x0a (control-J)
On output it means go to go down a line but don’t go to the left edge A typical eoln needs to occur using its ASCII standard of both a return character 0x0d AND a linefeed character 0x0a
Terminal codes: The following terms should have their VT100/XTERM meaning
- Left-Arrow
ESC [ D – both on input and on output
- Right-Arrow
ESC [ C – both on input and on output
- Up-Arrow
ESC [ A – both on input and on output
- Down-Arrow
ESC [ B – both on input and on output
- Home-key
ESC [ 1 ~ – input only
- End-key
ESC [ 4 ~ – input only
- Delete-to-the-right-key
ESC [ 3 ~ – input only
- PageUp-key
ESC [ 5 ~ – input only
- PageDown-key
ESC [ 6 ~ – input only
- Move-to-home-of-screen-upper-left
ESC [ H – output only
- Move-to-end-of-line
ESC [ F – output only
- Teleport-cursor-to-coordinate
ESC [ row ; col H – output only: rows and cols start counting at 1, not 0
- Clearscreen
ESC [ 2 J – output only
- Scroll-screen-up-one-line-keeping-cursor-where-it-is
ESC [ S – output only
- Scroll-screen-down-one-line-keeping-cursor-where-it-is
ESC [ T – output only
- Delete-to-the-left-of-cursor-ie-backspace
ESC [ K – output only
- Delete-at-the-cursor-toward-the-right
ESC [ 1 K – output only
XTERM codes: The following codes are for the XTERM emulation only
- Server-telling-client-to-resize-screen
ESC [ 8 ; newheight ; newwidth t – The height/width are in chars
- Server-telling-client-to-change-window-title
ESC ] 2 ; title string BEL – where BEL is the character normally used to mean beep: control-G or 0x07. But in this context it just marks the end of the title and shouldn’t cause a beep. Note this is NOT a typo that it uses a right-square-bracket (“]”) here where all the other codes used a left-square-bracket (“[“). That’s actually how the xterm control sequence for this really looks.
Any value not mentioned in the list above might still get sent, but you should be able to capture and ignore it.